
Fabric scraps & sewing
- Hair mask and headband
- Patchwork fabric frame
- Chickens fabric board
- Tutorials for hens and cocottes
- Sewing a stroller blanket
- Small felt hangers
- Where can I buy fabrics?
- Sewing a Barbie fairy dress
- Fairy hat and wand

Weaving and macramé decoration

Handcrafted home decorations: circular weavings, woven frames and macramé hangers
Handcrafted home decorations: circular weavings, woven frames and macramé hangers

Fairy dress for Barbie
Here's how to make a steamy fairy dress for a Barbie doll, with just a little fabric, tulle and lining... With the help of essential fairy accessories (hat and wand), this beautiful princess dress becomes the dress of a unique fairy... And the world of enchantment opens up to little girls' imaginations!
Fairy dress topmaterial:
- 4 rectangles of fabric: 4.5cm x 9cm (1 ¾ " x 3 ½")
- Tulle sleeves: 2 rectangles 15cm x 4cm (6" x 1 ½")
- Tulle to cover top 4 rectangles: 4.5cm x 9cm (1 ¾ " x 3 ½")
- 2 Ribbons for sleeves 7cm (2 ¾")
- 2 snaps.
Materialfor bottom of fairy dress
- Dress lining 16cm x 47cm (6 ½" x 18 ½")
- Top fabric 37cm x 20cm (14" x 8")
- Tulle 3 triangles : 24cm x 24cm x 13cm (9 ½" x 9 ½" x 5")

Preparing the top of the dress step 1


- Take the 4 rectangles and draw a mark 2.5cm from each side ( 1") at the top. Then mark the sides at 5cm from the bottom (2").
- Draw a line from point to point, then sew the fabric along the lines.
Preparing the top of the dress step 2

- Sew tulle to each top piece. Sew a hem in the back of the dress at the same time. And for the front, simply sew around the neckline.
- Sew the two front pieces together in the middle to form the neckline. Try on the doll for a perfect neckline.
- Sew the front and back pieces together at the shoulders.
Sewing the sleeves on the top

- Take the top right side out and pin the sleeves inside out for 2cm on each side of the sleeves. The rest will be gathered on top to give a puffed effect.
- Sew the sleeves right sides together with the pins. Then sew the rest together at the top.
Top stitching finishing step 1

- Turn the top inside out on the doll and pin to the sides. Then sew.
Sewing top finishing step 2 sleeves
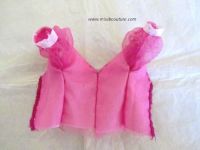
- Sew the ribbon to the sleeve ends, pleating the fabric.
Preparing the seam line for the top of the dress

- Turn the top inside out and draw a line on the bottom at 2cm ( ¾") on each side. Then join the lines in a triangle on the front (see image)
- Top and bottom will be sewn together following this line
Preparing the bottom of the dress

- Sew a hem on the bottom of the front fabric, then a hem on the lining.
- Sew the front fabric and lining together, pleating from time to time to adjust the size.
- Sew a hem on each triangle
- Place the triangles on the front fabric and pin them in place. Then sew on the top.
Dress top and bottom assembly

- Start by sewing the top and bottom together in the middle with a stitch. Μ- Then sew the rest on each side, pleating the fabric and following the line.
Dress finishing

- Sew the dress on the back. Leave a space at the top 1.5cm ( ½")and sew a hem, so the doll can pass through the dress.
- Sew the snaps on the back.
- Sew the decoration on the front (I used ribbon).
Just to conclude: don't miss the steps to make the fairy hat and its wand.
Your little fairy will be able to go and cast (nice) spells!
Fiche créative proposée par